
一张图喂进去,Markdown 直接吐出来:HunyuanOCR-1.5 × OpenVINO 端侧部署实战
 openlab_96bf3613
更新于 2月前
openlab_96bf3613
更新于 2月前
作者:杨亦诚
一、导语:把整条文档解析流水线压进一个模型
传统的文档智能方案,往往是一条长长的流水线:版面分析、表格检测、文字检测、文字识别、阅读顺序重建、后处理拼装……每一环都是一个独立模型,串起来又慢又脆,任何一环出错都会污染最终结果。
腾讯混元团队开源的 HunyuanOCR-1.5 走的是另一条路:一个端到端的 OCR 专用视觉语言模型(VLM),SigLIP 风格的视觉编码器搭配紧凑的 Hunyuan 文本解码器,把文档解析、文字检测识别(text spotting)、信息抽取、图像文字翻译,以及图表解析、公式识别、表格抽取、多语言文本问答等一系列以文字为中心的任务,统一在同一个模型里——你不需要换模型,只需要换一句 prompt。而且它足够小,小到可以真的跑在端侧设备上。
本文会带你完整走一遍这条部署路径:用 optimum-cli 一条命令导出 OpenVINO IR,用 NNCF 做「有选择」的权重压缩,再用 optimum-intel 的 OVModelForVisualCausalLM 在 Intel CPU / 核显 / Arc 独显上完成流式推理,最后启动一个交互式 Gradio Demo。文中所有代码都来自已经合并进 OpenVINO Notebooks 官方仓库的教程,可以直接对照运行。
二、先看一眼效果
下面这张示例文档图,是教程里由 gradio_helper.make_sample_image() 现场生成的——整个 notebook 不携带任何二进制素材,完全自包含,clone 下来就能跑。
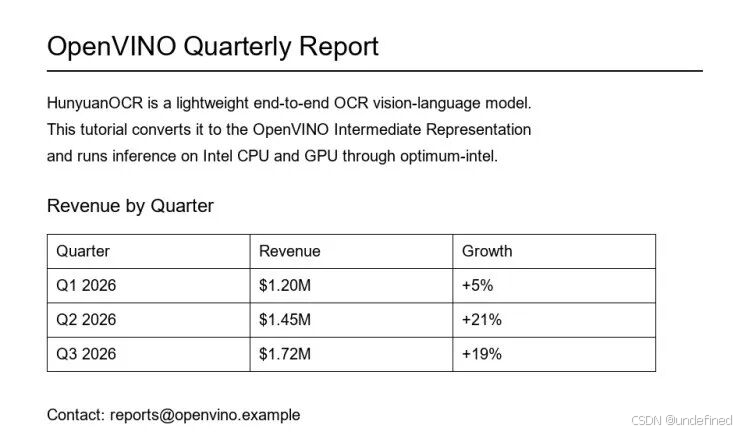
图 1:教程现场生成的示例文档图,包含正文段落与一张营收表格
把这张图连同默认的文档解析 prompt 一起喂给模型,它会按阅读顺序输出 Markdown 正文,其中表格以 HTML 表达、公式以 LaTeX 表达——正文和表格是一次生成出来的,中间没有任何检测 / 识别 / 拼装的胶水代码。
三、端到端部署 HunyuanOCR-1.5
3.1 环境准备
HunyuanOCR-1.5 提供了官方的 transformers 集成(HunYuanVLForConditionalGeneration + AutoProcessor),它需要引入了 hunyuan_vl 架构的 transformers 版本;OpenVINO 侧的导出则依赖 optimum-intel 的 hunyuan-ocr-support 分支:
%pip uninstall -q -y optimum optimum-intel optimum-onnxfrom notebook_utils import pip_installpip_install("-q", "torch>=2.8", "torchvision","--extra-index-url", "https://download.pytorch.org/whl/cpu")pip_install("-q","git+https://github.com/openvino-dev-samples/optimum-intel.git""@hunyuan-ocr-support",)pip_install("-q", "openvino>=2026.2.0", "nncf>=2.17.0")pip_install("-q", "gradio>=5.25.0", "Pillow>=10")pip_install("-q","git+https://github.com/huggingface/transformers.git""@b98026a3e058497cb16dbc5f1ff108eda9f54ddb",)
3.2 一条命令导出 OpenVINO IR
Optimum Intel 提供了命令行接口,把 HuggingFace 模型导出为 OpenVINO IR。对 HunyuanOCR-1.5 使用 image-text-to-text 任务:
optimum-cli export openvino \--model tencent/HunyuanOCR \--task image-text-to-text \--weight-format fp32 \HunyuanOCR/FP32
这条命令刻意用 --weight-format fp32 把所有子模型都导成全精度,权重压缩留到下一节单独做——这样才能按子模型分别指定精度。
3.3 用 NNCF 把语言模型压到 INT8
这个模型的精度分配是:语言模型和文本嵌入压到 INT8,视觉编码器保持 FP32。语言模型是体积大头,压缩收益主要来自它。
做法分两步——先按上一节整体导出 FP32,再用 nncf.compress_weights() 单独压缩 openvino_language_model 和 openvino_text_embedding***odel 这两个子模型,视觉编码器不动:
from pathlib import Pathimport openvino as ovimport nncffrom cmd_helper import optimum_climodel_id = "tencent/HunyuanOCR"model_dir = Path("HunyuanOCR") / precision.value # "INT8" 或 "FP32"if not model_dir.exists():optimum_cli(model_id,model_dir,additional_args={"task": "image-text-to-text","weight-format": "fp32",},)if precision.value == "INT8":names = ("openvino_language_model","openvino_text_embedding***odel")for name in names:xml_path = model_dir / f"{name}.xml"compressed = nncf.compress_weights(ov.Core().read_model(xml_path),mode=nncf.CompressWeightsMode.INT8_ASYM,)# 源 .bin 被 mmap 占用,无法原地覆盖:# 先写到临时路径,再原子替换。tmp_path = model_dir / f"{name}.int8.xml"ov.save_model(compressed, tmp_path)del compressedtmp_path.replace(xml_path)tmp_path.with_suffix(".bin").replace(xml_path.with_suffix(".bin"))
notebook 把上面这套流程封装成两个精度预设——INT8:语言模型 + 文本嵌入 INT8、视觉编码器 FP32(推荐);FP32:所有子模型全精度,作为参考基线。精度开关只作用于语言模型一侧,视觉编码器在两个预设下都是 FP32。
3.4 加载模型与选择推理设备
导出完成后,加载过程和原生 transformers 几乎一模一样:
from transformers import AutoProcessorfrom optimum.intel import OVModelForVisualCausalLMfrom notebook_utils import device_widgetdevice = device_widget(default="CPU", exclude=["NPU"])processor = AutoProcessor.from_pretrained(model_dir, trust_remote_code=True)model = OVModelForVisualCausalLM.from_pretrained(model_dir, device=device.value)
HunyuanOCR-1.5 可以跑在 Intel CPU、核显以及 Arc 独显上。
3.5 流式推理:对齐官方模型卡的用法
下面这段代码复刻了 tencent/HunyuanOCR 模型卡里的官方推理片段:构造一条包含图像 + 文本的对话消息,套用 chat template,然后贪心解码。差别只在于我们用后台线程配合 TextIteratorStreamer 把结果边解码边打印出来——文档解析动辄上千 token,流式输出能让等待过程不那么难熬。
import sysfrom threading import Threadfrom transformers import TextIteratorStreamerDOC_PARSE_PROMPT = ("Extract all the body text from the document image in markdown ""format. Ignore headers and footers, express tables in HTML ""format and formulas in LaTeX format, and organize the output ""in reading order.")def run_hunyuan_ocr(image_path, prompt=DOC_PARSE_PROMPT,max_new_tokens=1024):messages = [{"role": "user","content": [{"type": "image", "image": str(image_path)},{"type": "text", "text": prompt},],}]inputs = processor.apply_chat_template(messages,tokenize=True,add_generation_prompt=True,return_dict=True,return_tensors="pt",)tokenizer = (processor.tokenizerif hasattr(processor, "tokenizer") else processor)streamer = TextIteratorStreamer(tokenizer, skip_prompt=True, skip_special_tokens=True)gen_kwargs = dict(input****ax_new_token***ax_new_tokens,do_sample=False, streamer=streamer)thread = Thread(target=model.generate, kwargs=gen_kwargs, daemon=True)thread.start()output = ""for piece in streamer:sys.stdout.write(piece)sys.stdout.flush()output += piecethread.join(timeout=1.0)return output
调用它就可以了:
_ = run_hunyuan_ocr(sample_image, DOC_PARSE_PROMPT)

输出会以 Markdown 形式流式滚出来:正文段落是纯文本,表格被包在 <table> 标签里,公式则是 LaTeX——可以直接塞进任何 Markdown 渲染器。
四、一模多任务:换 prompt 就换能力
HunyuanOCR-1.5 真正好用的地方在于,它是「由 prompt 驱动」的。同一个已经加载好的模型实例,换一句指令就切换成另一个任务,不需要重新加载、不需要第二个模型。比如把文档解析换成文字检测识别:
_ = run_hunyuan_ocr(sample_image,"Detect and recognize the text in the image, ""and output the text with its coordinates.",max_new_tokens=512,)
模型这次输出的就不再是排好版的 Markdown,而是文本内容连同它们在图上的坐标。
五、交互式 Gradio Demo
教程最后提供了一个可以直接上手的 Gradio 界面:上传图片,选一个任务预设(或者自己写指令),解码结果会实时流式显示出来。
from gradio_helper import make_demodemo = make_demo(model, processor)try:demo.launch(debug=False, height=800)except Exception:demo.launch(debug=False, share=True, height=800)# 远程启动时可指定 server_name / server_port:# demo.launch(server_name='your server name',# server_port='server port number')
六、总结与资源链接
HunyuanOCR-1.5 把一整条文档智能流水线折叠进了一个端到端 VLM,而 OpenVINO + Optimum Intel 让它在 Intel CPU / 核显 / Arc 上的部署简化成「一条 optimum-cli + 几十行 Python」。
相关资源:
-
OpenVINO Notebooks 教程(upstream): https://github.com/openvinotoolkit/openvino_notebooks/tree/latest/notebooks/hunyuan-ocr
-
HunyuanOCR-1.5 模型卡: https://huggingface.co/tencent/HunyuanOCR
-
HunyuanOCR 官方 Space: https://huggingface.co/spaces/tencent/HunyuanOCR
-
HunyuanOCR-1.5 代码仓库: https://github.com/Tencent-Hunyuan/HunyuanOCR
-
OpenVINO Notebooks: https://github.com/openvinotoolkit/openvino_notebooks
-
Optimum Intel: https://github.com/huggingface/optimum-intel