使用 OpenVINO™ 运行 YOLOv5 推理
 openlab_4276841a
更新于 5年前
openlab_4276841a
更新于 5年前
1.0 简介
本文档介绍了一种将带 *.pt 扩展名的 YOLOv5 PyTorch* 权重文件转换为 ONNX* 权重文件,以及使用模型优化器将 ONNX 权重文件转换为 IR 文件的方法。该方法可帮助 OpenVINO™ 用户优化 YOLOv5,以便将其部署在实际应用中。
此外,本文档提供了一个关于如何运行 YOLOv5 推理的 Python 推理演示,以帮助加快 YOLOv5 的开发和部署速度。在最后一部分,针对使用 NCS2 运行推理引擎引发的 YOLOv5 模型准确度下降问题,本文亦提供了解决方案 - 修改与重建 libmyriadplugin.so,以使其适应 YOLOv5 模型。
2.0 将权重转换为 ONNX 文件
需要以下组件。
OpenVINO™ - 在本文档中,我们使用 OpenVINO™ Linux* 版本 2021.1 版进行验证
系统 – CPU 处理器。在 Linux Ubuntu* 18.04.1 上使用 Sky Lake 对本指南进行验证
Python* – 在本文档中,我们使用 Python 3.6.9 进行验证
ONNX – 在本文档中,我们使用 ONNX 1.6.0 进行验证
PyTorch – 在本文档中,我们使用 PyTorch 1.6.0 进行验证
Netron* – 在本文档中,我们使用 Netron 4.4.3 进行验证。
2.1. 从 GitHub 复制 YOLOv5 存储库
在 Linux 终端运行以下命令(在本文档中,提交 4d3680c 用于验证)。$ git clone https://github.com/ultralytics/yolov52.2. 设置 YOLOv5 的环境
若要设置 YOLOv5 的环境,需要运行以下命令来安装一些必要组件:$ pip install -r requirements.txt
$ pip install onnx2.3. 下载 PyTorch 权重
到目前为止,YOLOv5 存储库中有 3 个标签。由于骨干网的不同,YOLOv5 分为 YOLOv5s、YOLOv5m、YOLOv5l 和 YOLOv5x。此处,我们使用来自标签 v3.0 的 YOLOv5s 进行说明。运行以下命令,以下载 yolov5s.pt:$ wget https://github.com/ultralytics/yolov5/releases/download/v3.0/yolov5s.pt2.4. 将 PyTorch 权重转换为 ONNX 权重
YOLOv5 存储库提供了 models/export.py 脚本,您可以使用该脚本将带 *.pt 扩展名的 PyTorch 权重导出为带 *.onnx 扩展名的 ONNX 权重由于 OpenVINO™ 2021.1 还未全面支持 ONNX opset 版本 11,因此我们需要将 models/export.py 脚本的第 69 行修改为 opset 版本 10:
torch.onnx.export(model, img, f, verbose=False, opset_version=10, input_names=['image******r> output_names=['classe******oxes'] if y is None else ['out put'])然后保存脚本并运行以下命令:
$ python models/export.py --weights yolov5-v3/yolov5s.pt --img 640 -- batch 1随后,我们将在 yolov5-v3 文件夹中得到 yolov5s.onnx。
3.0 将 ONNX 文件转换为 IR 文件
从上一节中得到 ONNX 权重文件后,我们可以使用模型优化器将其转换为 IR 文件。
运行以下脚本,以临时设置 OpenVINO™ 环境和变量:
$ source /opt/intel/openvino_2021/bin/setupvars.sh在使用模型优化器转换 YOLOv5 模型时,我们需要指定 IR 的输出节点。
图1.经过 8 倍下采样的 YOLOv5 骨干网 P3 的输出节点,用于检测小型对象。
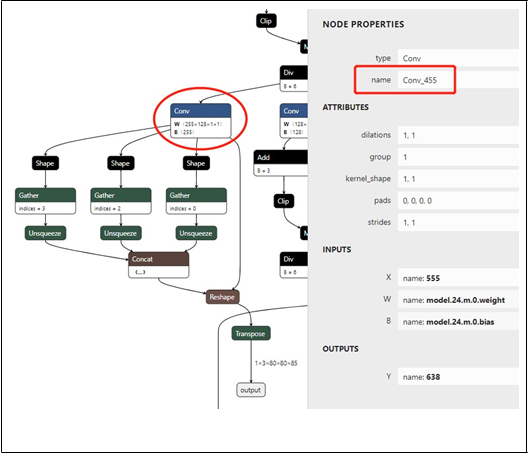
YOLOv5 中有 3 个输出节点。我们使用 Netron 查看 YOLOv5 ONNX 权重。然后通过在 Netron 中搜索关键词“Transpose”找到输出节点。随后,我们可以查找卷积节点,该节点在图 1. 中被标记为椭圆形。双击节点后,我们可以在属性面板中读取其名称“Conv_455”,名称在 图 1 中被标记为矩形。图 1 显示大小为 1x3x80x80x85 的输出节点和分辨率为 1x3x640x640 的输入图像,用于检测小型对象。 我们使用卷积节点的名称“Conv_455”来指定模型优化器参数。
图 2. 经过 16 倍下采样的 YOLOv5 骨干网 P4 的输出节点,用于检测中型对象。
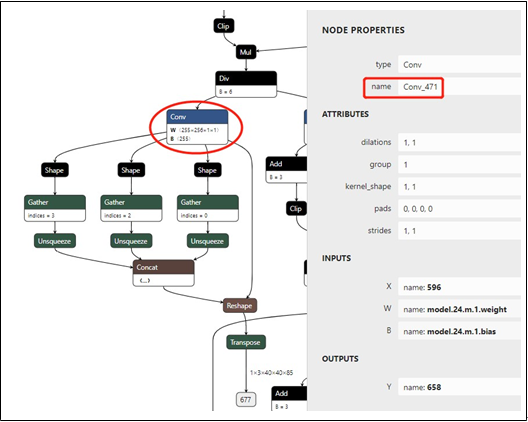
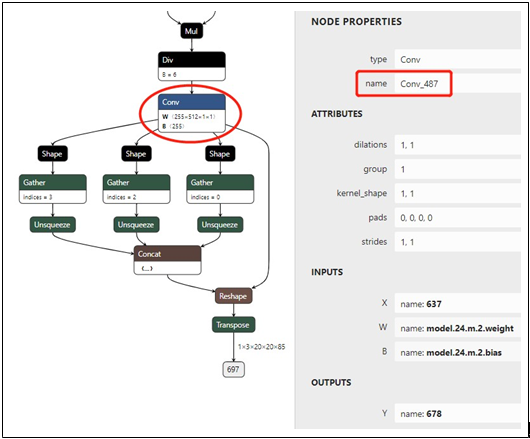
我们可以采用类似的方式获取另外两个卷积节点的名称。图 2 显示大小为 1x3x40x40x85 的输出节点和分辨率为 1x3x640x640 的输入图像,用于检测中型对象。 读取被标记为矩形的卷积名称“Conv_471”。图 3 显示大小为 1x3x20x20x85 的输出节点和分辨率为 1x3x640x640 的输入图像,用于检测大型对象。 读取被标记为矩形的卷积名称“Conv_487”。
然后运行以下命令,以生成 YOLOv5 模型的 IR:
$ python
/opt/intel/openvino_2021.1.110/deployment_tool***odel_optimizer/mo.py
--input_model yolov5-v3/yolov5s.onnx --model_name yolov5-v3/yolov5s -***r>255 --reverse_input_channels --output Conv_487,Conv_471,Conv_455
其中,--input_model 定义预训练模型,参数 --model_name 是生成的 IR 和 output .xml/.bin 文件中的网络名称,-s 表示来自原始网络输入的所有输入值都将除以该值,-- reverse_input_channels 可将输入通道顺序从 RGB 转变为 BGR(或者从 BGR 转变为 RGB),--output 表示模型输出运算的名称。
随后,我们将在 yolov5-v3 文件夹中得到 YOLOv5s 的 FP32 格式 IR。
图 3. 经过 32 倍下采样的 YOLOv5 骨干网 P5 的输出节点,用于检测大型对象。
4.0 推理 Python 演示
生成 YOLOv5 模型的 IR 后,我们根据 YOLOv5 模型的推理流程编写推理 Python 演示。根据 OpenVINO™ 默认 Python 演示中提供的 YOLOv3 演示,YOLOv5 演示中主要有 3 点需要修改:1) 使用 letterbox 预处理输入图像
2) 使用 Sigmoid 函数的 YOLO region 层
3) 边界框后处理
点击此处下载 YOLOv5 Python 演示
4.1. 使用 letterbox 预处理输入图像
YOLOv5 使用 letterbox 处理网络的输入图像。在 YOLOv5 推理 Python 演示中,我们提供了一个用于处理图像的函数:def letterbox(img, size=(640, 640), color=(114, 114, 114), auto=True, scaleFill=False,
scaleup=True):
# Resize image to a 32-pixel-
multiple rectangle https://github.com/ultralytics/yolov3/issues/232
shape = img.shape[:2] # current shape [height, width]
w, h = size
# Scale ratio (new / old)
r = min(h / shape[0], w / shape[1])
if not scaleup: # only scale down, do not scale up (for better test mAP)
r = min(r, 1.0)
# Compute padding
ratio = r, r # width, height ratio***r>new_unpad = int(round(shape[1] * r)), int(round(shape[0] * r))
dw, dh = w - new_unpad[0], h - new_unpad[1] # wh padding
if auto: # minimum rectangle
dw, dh = np.mod(dw, 64), np.mod(dh, 64) # wh padding
elif scaleFill: # stretch dw, dh = 0.0, 0.0 new_unpad = (w, h)
dw /= 2 # divide padding into 2 side***r>
dh /= 2
if shape[::-1] != new_unpad: # resize
img = cv2.resize(img, new_unpad, interpolation=cv2.INTER_LINEAR) top, bottom = int(round(dh - 0.1)), int(round(dh + 0.1))
left, right = int(round(dw - 0.1)), int(round(dw + 0.1))
img = cv2.copyMakeBorder(img, top, bottom, left, right, cv2.BORDER_CONSTANT, value=color) # add border
top2, bottom2, left2, right2 = 0, 0, 0, 0
if img.shape[0] != h:
top2 = (h - img.shape[0])//2 bottom2 = top2
img = cv2.copyMakeBorder(img, top2, bottom2, left2, right2, cv2.BORDER_CONS TANT, value=color) # add border
elif img.shape[1] != w:
left2 = (w - img.shape[1])//2
right2 = left2
img = cv2.copyMakeBorder(img, top2, bottom2, left2, right2, cv2.BORDER_CONS TANT, value=color) # add border
return img4.2. 使用 Sigmoid 函数的 YOLO Region 层
在对 YOLOv5 的每个检测头执行最后的卷积后,YOLOv5 使用 Sigmoid 函数处理推理中的输出。YOLOv5 Python 演示中的 YOLO region 层的解析函数与 YOLOv3 Python 演示中的解析函数不同。我们在此处提供了解析 YOLO region 层的代码:def parse_yolo_region(blob, resized_image_shape, original_im_shape, params, thres hold):
# ------------------------------------------ Validating output parameter**********************************************r>
out_blob_n, out_blob_c, out_blob_h, out_blob_w = blob.shape
predictions = 1.0/(1.0+np.exp(-blob))
assert out_blob_w == out_blob_h, "Invalid size of output blob.It should be in NCH W layout and height should " \
"be equal to width.Current height = {}, current width = {}" \
"".format(out_blob_h, out_blob_w)
# ------------------------------------------ Extracting layer parameter***********************************************r>
orig_im_h, orig_im_w = original_im_shape
resized_image_h, resized_image_w = resized_image_shape
objects = list()
side_square = params.side * params.side
# ------------------------------------------- Parsing YOLO Region output ----------------
---------------------------
bbox_size = int(out_blob_c/params.num) #4+1+num_classe***r>for row, col, n in np.ndindex(params.side, params.side, params.num):
bbox = predictions[0, n*bbox_size:(n+1)*bbox_size, row, col]
x, y, width, height, object_probability = bbox[:5]
class_probabilitie*****box[5:]
if object_probability < threshold: continue
x = (2*x - 0.5 + col)*(resized_image_w/out_blob_w) y = (2*y - 0.5 + row)*(resized_image_h/out_blob_h)
if int(resized_image_w/out_blob_w) == 8 & int(resized_image_h/out_blob_h) == 8: #80x80,
idx = 0
elif int(resized_image_w/out_blob_w) == 16 & int(resized_image_h/out_blob_h)
== 16: #40x40
idx = 1
elif int(resized_image_w/out_blob_w) == 32 & int(resized_image_h/out_blob_h)
== 32: # 20x20
idx = 2
width = (2*width)**2* params.anchors[idx * 6 + 2 * n]
height = (2*height)**2 * params.anchors[idx * 6 + 2 * n + 1] class_id = np.argmax(class_probabilitie****r>confidence = object_probability
objects.append(scale_bbox(x=x, y=y, height=height, width=width, class_id=clas***r>_id, confidence=confidence,
im_h=orig_im_h, im_w=orig_im_w, resized_im_h=resized_image_h
, resized_im_w=resized_image_w)) return objects4.3. 边界框后处理
由于 YOLOv5 使用 letterbox 处理输入图像,因此我们需要重写边界框后处理,以得到正确的检测结果。缩放边框 (scale box) 函数如下所示:def scale_bbox(x, y, height, width, class_id, confidence, im_h, im_w, resized_im_h=64
0, resized_im_w=640):
gain = min(resized_im_w / im_w, resized_im_h / im_h) # gain = old / new
pad = (resized_im_w - im_w * gain) / 2, (resized_im_h - im_h * gain) / 2 # wh paddi ng
x = int((x - pad[0])/gain)
y = int((y - pad[1])/gain)
w = int(width/gain)
h =
xmin = max(0, int(x - w / 2))
ymin = max(0, int(y - h / 2)) xmax = min(im_w, int(xmin + w)) ymax = min(im_h, int(ymin + h))
# Method item() used here to convert NumPy types to native types for compatibility with functions, which don't
# support Numpy types (e.g., cv2.rectangle doesn't support int64 in color paramete
r)
return dict(xmin=xmin, xmax=xmax, ymin=ymin, ymax=ymax, class_id=class_id.ite m(), confidence=confidence.item())5.0 NCS2 的准确度下降问题
相比在 CPU 上运行 FP16 推理得到的检测结果,我们注意到将 NCS2 设置为运行推理引擎的设备时,某些对象可能无法被 YOLOv5 模型检测到。这是因为图形转换工具使用的缩放比例适合大多数网络,但是有时可能不适合某些网络。为了解决该问题,需要修改 weights_analysis.cpp 中的缩放比例并重建 libmyriadPlugin.so。
首先需运行以下命令,从 GitHub 中复制 OpenVINO™ 存储库:
$ git clone https://github.com/openvinotoolkit/openvino然后运行以下命令,从而切换到 OpenVINO™ 2021.1:
$ cd openvino

$ git submodule update --init --recursive

$ git checkout -b yolov5 2021.1
将 inference- engine/src/vpu/graph_transformer/src/middleend/passes/ 中的 weights_analysis.cpp 的第 243-248 行修改为:
if (firstStage && shift < 4 && isGrowingOutput && weights->desc().dim(Dim::C)
	> 1) {
normalVal = 5;
shift = correctShift(shift, firstStage, stage->origLayer()->type); shift -= normalVal;
}

//shift = correctShift(shift, firstStage, stage->origLayer()->type);
//shift -= normalVal;
然后运行以下命令,以构建 OpenVINO™:
$ mkdir build & cd build

$ cmake -DCMAKE_BUILD_TYPE=Release -DENABLE_PYTHON=ON -
DPYTHON_EXECUTABLE=`which python3.6`	- DPYTHON_LIBRARY=/usr/lib/x86_64-linux-gnu/libpython3.6m.so	- DPYTHON_INCLUDE_DIR=/usr/include/python3.6 ..

$ make --jobs=$(nproc --all)
之后,您可以在 bin/intel64/Release/lib/ 中找到 libmyriadPlugin.so。我们可以对原始的 libmyriadPlugin.so 进行备份,将新创建的 libmyriadPlugin.so 复制到文件夹 /opt/intel/openvino/inference_engine/lib/intel64/。然后,我们可以使用 NCS2 运行 YOLOv5 推理演示,得到的检测结果与使用 CPU 得到的检测结果几乎相同。
6.0 结论
本白皮书旨在帮助客户将 YOLOv5 模型应用到其应用中。
本文档详细介绍了如何将 PyTorch 权重文件转换为 ONNX 权重文件,以及如何使用 OpenVINO™ 模型优化器,从 ONNX 权重文件中生成 YOLOv5 模型的 IR。此外,本文档提供了针对 YOLOv5 模型的推理演示,适用于 YOLOv5s、YOLOv5m、YOLOv5l 和 YOLOv5x 模型推理。针对使用 NCS2 部署 YOLOv5 模型引发的准确度下降问题,本文档还提供了解决方案。
通过阅读本白皮书,客户可以更轻松地开发与部署其应用。