在Windows中基于Visual Studio配置OpenVINO C++开发环境
 openlab_4276841a
更新于 3年前
openlab_4276841a
更新于 3年前
作者:王一凡 英特尔物联网行业创新大使
本文主要介绍在Windows中基于Visual Studio配置OpenVINO C++开发环境,主要步骤有:
1. 下载并安装Visual Studio Community版
2. 下载并解压OpenVINO Runtime
3. 下载并解压OpenCV
4. 在Visual Studio中配置项目属性
5. 运行OpenVINO C++范例程序,测试开发环境
下面,本文将依次详述
1.1 下载并安装Visual Studio Community版
Microsoft Visual Studio(简称VS)是Windows平台上非常好用的集成开发环境(IDE),其Community版本免费供学生、开放源代码参与者和个人使用。
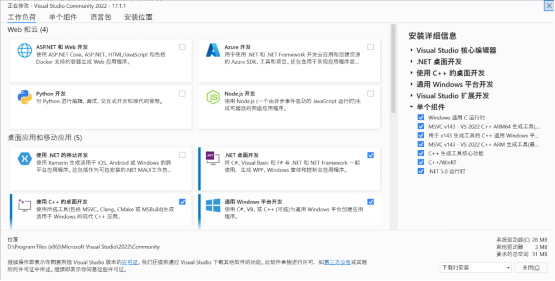
从https://visualstudio.microsoft.com/zh-hans/downloads/ 下载Visual Studio 2022 Community版,安装选项如图 1-1所示。
1.2 下载并解压OpenVINO Runtime
OpenVINOTM Runtime 2022.3以压缩包(OpenVINO Archives)的形式提供,里面包含了开发OpenVINO C++推理程序所必需的文件,如图 1-2所示:
C++预处理器所需的头文件:include文件夹
C++链接器所需的lib文件:lib文件夹
可执行文件(*.exe)所需的动态链接库文件:bin文件夹
OpenVINO runtime第三方依赖库文件:3rdparty文件夹
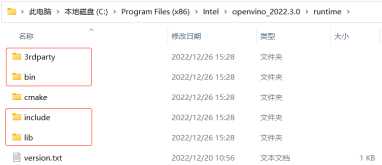
图 1-2 开发OpenVINO C++推理程序所必需的文件
首先,请读者先打开下面的链接,下载OpenVINOTM Runtime 2022.3压缩包。
https://www.intel.com/content/www/us/en/developer/tools/openvino-toolkit/download.html
然后,请读者手动新建C:\Program Files (x86)\Intel\openvino_2022.3.0文件夹,并把压缩包解压后的文件拷贝到openvino_2022.3.0文件夹中,完成OpenVINO Runtime压缩包的下载和解压工作,如图 1-3所示。

图 1-3 下载并解压OpenVINO Runtime压缩包
1.3 下载并解压OpenCV
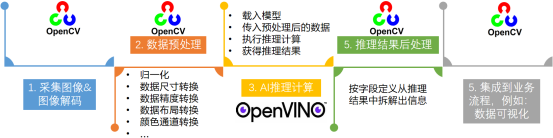
在端到端的AI推理计算流程中,OpenCV库用于实现图像载入、数据前处理、推理结果后处理和数据可视化,如图 1-4所示。
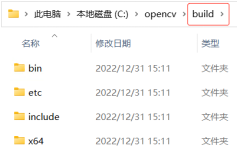
OpenCV也是以压缩包的形式提供,从https://opencv.org/releases/下载Windows平台上的压缩包。首先,手动新建C:\opencv文件夹;然后,把OpenCV解压后的build文件夹全部拷贝到C:\opencv文件夹,如图 1-5所示,完成OpenCV的下载并解压。
1.4 在Visual Studio中配置项目属性
在Visual Studio中配置项目属性,主要是告诉C++编译器和链接器,OpenVINO和OpenCV的头文件以及库文件在哪里。
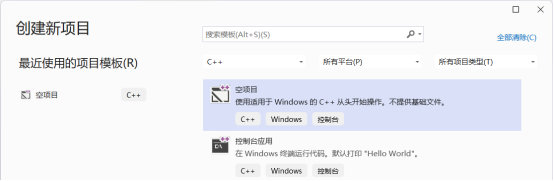
第一步,打开Visual Studio 2022 Community,在“文件(F)”菜单中选择“新建(N)→项目(P)”,新建一个C++空项目。
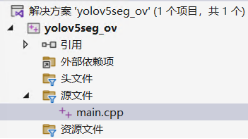
第二步,在“文件(F)菜单”中选择“新建(N)→文件(F)”,新建一个main.cpp文件,并添加到项目管理器的源文件文件夹中。
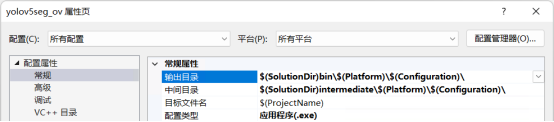
第三步,在“解决方案资源管理器”中,右键单击项目名称,在右键菜单中选择“属性(R)”,启动“属性页”对话框。
在“配置(C)”栏选择“所有配置”,在“平台(P)”栏选择“所有平台”;
在“输出目录”输入“$(SolutionDir)bin\$(Platform)\$(Configuration)\”;
在“中间目录”输入“$(SolutionDir)Intermediate\$(Platform)\$(Configuration)\”
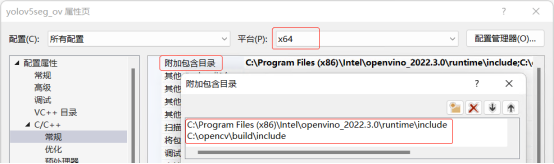
第四步,在“属性页”对话框中选中“C/C++→常规”;在“平台(P)”栏选择“x64”;在“附加包含目录”中输入:
C:\Program Files (x86)\Intel\openvino_2022.3.0\runtime\include
C:\opencv\build\include
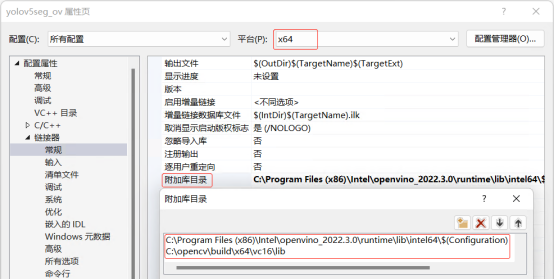
第五步,在“属性页”对话框中选中“链接器→常规”;在“平台(P)”栏选择“x64”;在“附加库目录”中输入:
C:\Program Files (x86)\Intel\openvino_2022.3.0\runtime\lib\intel64\$(Configuration)
C:\opencv\build\x64\vc16\lib
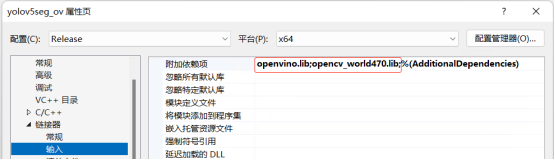
第六步,在“属性页”对话框中选中“链接器→输入”,在“配置(C)”栏选择“Debug”,在“平台(P)”栏选择“x64”,然后在“附加依赖项”中添加:
openvinod.lib;opencv_world470d.lib;
将“配置(C)”栏改为“Release”,然后在“附加依赖项”中添加:
openvino.lib;opencv_world470.lib;
到此,完成在Visual Studio中配置OpenVINO C++推理计算项目属性。
1.5 运行OpenVINO C++范例程序,测试开发环境
首先,请将下面的代码拷贝到main.cpp中,源代码下载地址:
https://gitee.com/ppov-nuc/yolov5_infer/blob/main/test_ov_opencv.cpp
#include <iostream>

#include <string>

#include <openvino/openvino.hpp> //openvino header file

#include <opencv2/opencv.hpp>    //opencv header file

int main(int argc, char* argv[]) {

    // -------- Get OpenVINO runtime version --------

    std::cout << ov::get_openvino_version().description << ':' << ov::get_openvino_version().buildNumber << std::endl;

    // -------- Step 1. Initialize OpenVINO Runtime Core --------

    ov::Core core;

    // -------- Step 2. Get list of available devices --------

    std::vector<std::string> availableDevices = core.get_available_devices();

    // -------- Step 3. Query and print supported metrics and config keys --------

    std::cout << "Available devices: " << std::endl;

    for (auto&& device : availableDevices) {

        std::cout << device << std::endl;

    }

    // -------- Step 4. Read a picture file and show by OpenCV --------

    cv::Mat img = cv::imread("zidane.jpg"); //Load a picture into memory

    cv::imshow("Test OpenVINO & OpenCV IDE", img);

    std::cout << "Image width: " << img.cols << " height: " << img.rows << std::endl;

    cv::waitKey(0);

    cv::destroyAllWindows();

    return 0;

} 然后,将OpenCV和OpenVINO动态链接库所在的位置,添加到path环境变量中。
C :\Program Files(x86)\Intel\openvino_2022 .3.0\runtime\bin\intel64\Release

C :\Program Files(x86)\Intel\openvino_2022 .3.0\runtime\bin\intel64\Debug

C :\Program Files(x86)\Intel\openvino_2022 .3.0\runtime\3rdparty\tbb\bin

C :\opencv\build\x64\vc16\bin 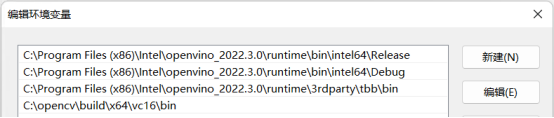
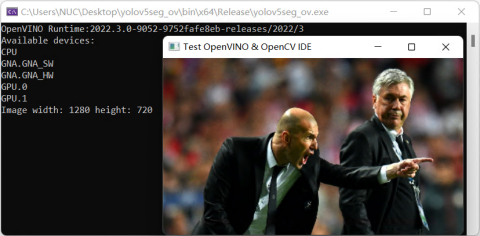
最后,编译并运行上述代码,结果如下图所示:
1.6 总结
本文详述了从零开始在Windows上基于Visual Studio配置开发OpenVINO C++ 推理程序的全过程,并给出了完整的测试程序代码test_ov_opencv.cpp。环境配置成功后,就可以开始用C++编写OpenVINO推理程序了。